

Image: Shutterstock
Any form of art is therapeutic and involves a lot of fine movements of the fingers, therefore increasing and improving their fine motor skills. In this post, we bring to you some incredibly interesting art and sculpture ideas for kids to keep them engaged at home. These hands-on activities are fun and also beneficial for the all-round development of children. They help with modeling and carving. So if you wish to learn more ideas to keep your kids entertained and benefit their growth, read on as this post has a lot in store for you.
3D Art And Sculpture For Kids To Inspire Creativity
1. Beads Dreamcatcher:

Image: Shutterstock
You Will Need:
- Embroidery hoop
- Lace, open-weave or thin fabric
- Blunt needle
- Beads
- Feathers
- Yarn
How To:
- Tell your child to place the fabric or lace between two embroidery hoops. Trim off the excess.
- 使用锁缝,告诉她把刺ough the bottom and outside the hoop. Help her add a few beads to every stitch and continue stitching all around the hoop.Your kidcan add details in the middle of the hoop too.
- To hang the feathers, cut a 12-inch long yarn and tie a feather to the end. String the beads on the other end of the yarn and tie through the bottom of the hoop.
2. Turkey Tale:

You Will Need:
- Scissors
- Toilet paper tubes
- Craft brush
- School glue
- Glitter
- Googly eyes
How To:
- 告诉你的孩子把厕纸管切成turkey shapes. She has to start by cutting the spike for the neck and head and cut a spike on each side for the wings. Throw away the two triangular pieces after the step.
- Now tell her to make slits for the feathers and fan it out gently.
- Apply the glue strategically on the feather strips and dust some glitter.
- Now stick the googly eyes on the ‘head’ of the turkey and you are done.
3. Nest And Eggs:
You Will Need:
- Air-dry clay
- Craft paint
- Brush
- Wax paper
- Stalks
- Dried grass
How To:
- Tell your child to shape ten eggs from the clay. Leave the eggs to dry overnight. You can even bake the clay if you want it to dry faster.
- Once the eggs have dried, tell her to paint them with her choice of colors and design. Two coats of paint would be perfect. Leave it to dry on the wax paper.
- Now gather the stalks, dried, and begin building a nest. Your kid has to shape, press, and fluff and weave the dried plant until she gets a full nest. She can use the stalks for forming the nest.
- Place the eggs in the nest and it’s ready.
 Quick tip
4. Egg Carton Flowers:

You Will Need:
- Egg cartons
- Paint
- Tissue paper
- Pipe cleaners
- Scissors
How To:
- Tell your kid to paint the egg cartons cups and poke holes at the bottom of the cups with scissors.
- Now thread the pipe cleaners through the holes and tie a loose knot at the base and inside the carton cup.
- Now tell your kid to take the tissue paper circle, gather with her fingers and glue into the cups. The flowers are ready. You may use real flowers as inspiration.
5. Paper Plate Rose:
You Will Need:
- Red paper plates
- Black marker
- Scissors
- Glue
How To:
- Tell your kid to cut a ‘snail’ into the paper plate. It does not need to be perfect.
- Have yourchild writea message along the paper plate spiral with the black marker.
- Now tell her to take the outside edge, twisting and shaping it like a flower. Use with glue to affix it.
6. Melted Crayon Rock:

You Will Need:
- Small and smooth rocks
- Oven
- So based or wax based crayons
- Baking sheet
- Towel or mat to cover your table
- Foil
How To:
- Tell your kid to wash and dry the rocks and spread on a cookie sheet lined with aluminum foil. Now put them in the oven and heat at 350 degrees Fahrenheit.
- Once the stones are hot, transfer them one by one on the workstation covered with a washcloth or mat.
- Now tell your kid to color the rocks with the crayons. Your child will notice that the crayon will start melting over the rock, creating a coloring coating.
- Allow your kid to use different colored crayons to make beautiful art.
Quick tip7. Plaster Leaf Casting:

You Will Need:
- Plaster of Paris
- Leaves
- Play dough
- Metallic paint
How To:
- Mix two parts of plaster of Paris with one part water to create a molding mixture.
- Pour the Plaster of Paris mixture over an assortment of leaves and press lightly,
- Once the plaster hardens, pull off the leaf.
- Now tell your kid to paint the leaves with watercolors. Leave it to dry overnight. The beautifulsculpture forchildren is ready. You can even make statue and other figure with this mixture.
8. Yarn Bowl:

You Will Need:
- Strands of yarn
- White school glue slightly thinned with water
- A bowl
How To:
- Turn the bowl upside down and cover with the plastic wrap.
- Now tell your kid to soak the yarn in the glue for some time. Squeeze out the excess and wrap the yarn around the bowl.
- Tell your child to cover the bowl entirely with yarn. Leave the bowl overnight to dry.
 Point to consider
9. Colored Ice Sculpture:

Image: Shutterstock
You Will Need:
- Cups, bowls and muffin tins of various sizes and shapes
- 水
- Food coloring or liquid watercolors
How To:
- These ice sculptures are perfect for toddlers and preschoolers.
- Divide the water in different containers and add a few drops of food coloring or watercolor in each. Make sure the food coloring is of different shades.
- Freeze the dyed water in containers such as bowls, muffin pans, and cake pans.
- Put some fake snow on the table and arrange the ice sculptures for the kids to play. This is one of the best and easy sculptureideas for kids.
10. Lighted Wooden Stars:
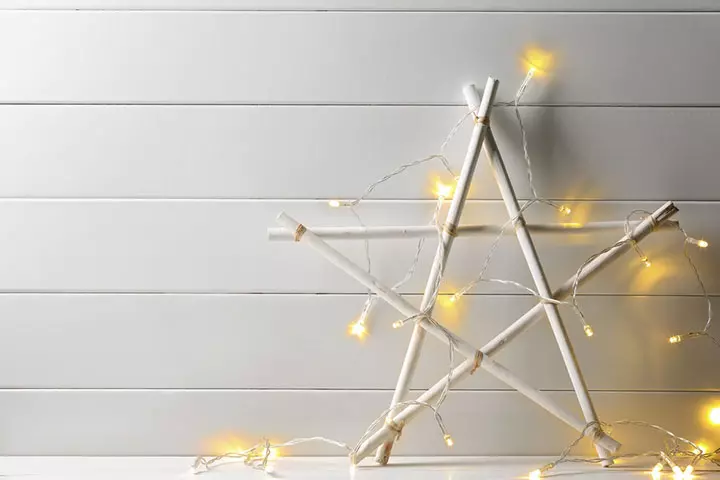
Image: Shutterstock
You Will Need:
- Yardstick
- Christmas light
- Hot glue gun
- Paint
How To:
- Help your kid arrange the yardstick in the star shape and secure it with a hot glue gun. Leave it to dry.
- When the star dries, paint the star in any shade you like. But before painting, tell him/her to apply a coat of primer first.
- Now wrap a string of white Christmas lights around the edges of the star.
These tactile simple art and sculpture ideas will not just teach basic three-dimensional shapes to your child but will also encourage their artistic spirit. When you have the right tools and references, it is easy to make abstract or representational art. And learning techniques and practicing them often will make you even better.
Frequently Asked Questions
1. Can I use household items to create sculptures with children?
Yes, it is possible to create sculptures with children using household items. You may recycle old household items, such as cardboard boxes and plastic bottles, to create various sculptures.
2. What materials are safe and fun for children to use for sculpting?
Modeling clay is a great option, as it is non-toxic and can be baked to preserve the sculpture. Soft and lightweight materials such as foam, sponge, and paper can also be used for sculpting.
3. What types of sculpture projects are good for outdoor play?
Sculptures made from natural materials, such as stones, pebbles, and wood, can be great for the outdoors since they can withstand weather elements better. They are also not precious or expensive, so you do not have to worry about them getting stolen.
4. Can sculpture projects help with sensory development in children?
Yes, sculpture projects may help with sensory development in children since making them requires the child to use their sensory skills in unison with concentration.
5. How can I make a sculpture project educational for children?
You may encourage the child to make sculptures that involve letters and numbers. Sculptures that involve counting, such as an abacus, can help the child learn and play at the same time. Children may also create different letter cardboard and old materials.
6. What are some benefits of doing sculpture projects with children?
General benefits include improved creativity, stimulation of fine motor skills, development of social skills, and understanding various subjects, such as math, through sculptures.
Key Pointers
- Art is therapeutic and beneficial for children’s imagination and fine motor skills.
- Some easy 3D art and sculpture ideas for kids include bead dreamcatcher, turkey tale, egg carton flowers, paper plate roses, and melted crayon rocks.
- Plaster leaf casting, lighted wooden stars, and yarn bowls are artistic activities that can be used as decorative pieces in the house.
Infographic: Ideas For 3D Sculpture And Art To Boost Children’s Creativity
In today’s digitized world of 3D and virtual reality, keeping children away from electronic devices has become difficult. The infographic below includes some simple and creative suggestions for 3D sculpting and art ideas that your children may find refreshing and entertaining. Take a look!

Illustration: Momjunction Design Team
Get high-quality PDF version by clicking below.
 Download Infographic

创建一个惊人的3 d纸雕塑的埃菲尔铁塔Tower for your home decor! Unleash your creativity through an effortless DIY tutorial, enabling you to craft this exquisite masterpiece.


